|
DeHavilland CC-115 Buffalo Ray McDougall build-log
|
||||
|
|
|
|||
|
Nov.
16 2009 |
||||
|
After the first week the fuse and wings are beginning to
take shape.....quite standard construction, nothing
revolutionary here. |
||||
|
|
||||
|
|
||||
|
|
||||
|
The covering and paint has been added to the tailfeathers. The covering is Sig Coverall applied in the usual manner. The 1/16 balsa sheeting is first prepped with one coat of nitrate dope to seal the wood from moisture of the in the next coats.....otherwise it will warp. Two coats of clear water based urethane is then applied with a brush to fill the weave and permanently stick the cloth to the wood. Three coats of latex color is then airbrushed on. The final coat is a latex based clearcoat, either flat or semi-gloss depending on the look desired. The decals are made with the ink-jet printer onto waterslide decal paper. Now that I know the system works well I can begin covering the rest of the airplane. it will be the lightest way to cover with fabric that I have seen. I don't like film coverings on a scale model. All of the components are also inexpensive, non-toxic and can be fuel-proofed if necessary. |
||||
|
|
||||
|
Here the center wing panel and the forward battery hatch have been built and fitted to the fuse. The fuse is now ready for covering as described above. |
||||
|
January 2010; In
this shot the fuse has been covered and painted.....the
waterslide decals are being laid out and applied. It's
starting to look like a C115. The paper racing stripe on the
side of the fuse is just for a trial fit.....getting these
graphics to correct scale is not easy and the decal paper is
expensive so I like to do it on paper first to get the right
size and finally print out the graphics on the decal paper
as per the sheet standing against the fuse. Some very good
photos were available on Airliners.net and I was able to
trace the graphics off the photos and reproduce them
directly onto the decal paper using the Photoshop program.
What a cool airplane.....I love DeHavilland.
|
||||
|
|
||||
| I did'nt like the way the cockpit windows were turning out so I cut off the entire wood framed canopy area and made up a balsa pattern for vacum forming a new one.....After vacum forming the new cowl I masked out the window areas with mylar paint-mask, sprayed on a coat of primer, the yellow coats and finally a coat of clear. The canopy is screwed in place and is removable. | ||||
|
|
||||
|
|
||||
|
Here are the finished glass cowls, primed and ready for paint....
I saw this cool flashlight keychain in Canada Tire and
couldn't help but think what a nice landing light it would
make.....just the right shape.....
So I tore it all
apart, saved only the essentials and wired it up for a
rechargeable battery pack. It will fit into the wing easily
and look good. A plastic cover will go in the front.
Here are the
finished wingtips complete with ailerons.
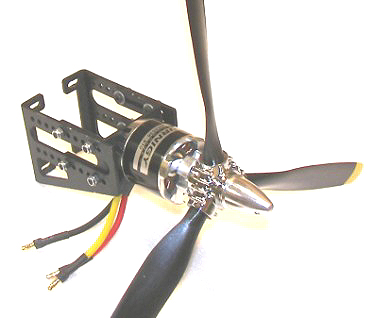
Motor Turnegy AerodriveXp SK Series 35-36 91 KV rating 910 RPM / V Rated power 310W Props used two 11" X 8" three-blade Battery 2500mah Litheum 11.1v 3-cell Measured RPM 8700 Measured draw 236W 24A Motor & prop weight 7.5 oz.
The aluminum firewall mount is from Hobby City.....
Here is the electric retract set from EPF Hobby in Taiwan.
The controller plugs into your receiver gear channel and the
power is from the receiver battery (or a separate 6v.
battery). It is fully electric with no servos or air supply
to worry about. the travel is 90 degrees and the wheels move
very slowly and realistically. The quality of the three
retract units is excellent..... all machined metal
construction. The nosewheel is steerable from the rudder
servo. The operating units are very light and strong enough
for an 8 to 10 lb. airplane. The supplied oleo legs were too
small for the Buffalo so I purchased the larger oleos from
RC Warbirds in Singapore.
April 18th, 2010
|
||||


.jpg)
